Setting up an EKS cluster with IAM/IRSA integration
Introduction
AWS’ IAM service is a powerful system to provide fine-grained control over AWS resources. Additionally it is integrated into several AWS services and EKS is no exception. Next to the cluster role, AWS introduced 2019 the concept of IRSA, which stands for IAM Roles for Service Accounts.
Together with Kubernetes’ RBAC system it allows to assign IAM role capabilities to K8s computing resources like Pods and Jobs. A simple use case you can imagine is allowing a Pod to write to a S3 bucket. After reading through this blog post you will understand how to create an EKS cluster using Terraform with IRSA support and how to make use of it.
Preparing the VPC
Before creating an EKS cluster you need to set up a VPC network that your data and control plane traffic can go through. It will also define whether your Kubernetes API endpoint will be accessible publicly or only from within a private network.
Depending on your requirements the VPC configuration can be more or less complex. If you don’t want to do anything too crazy I suggest to use aws-vpc module. It provides a nice abstraction layer for the AWS VPC Terraform resources that are being used under the hood. Below you can find an example VPC configuration that can act as a starting point for your EKS.
1
2
3
4
5
6
7
8
9
10
module "vpc" {
  source = "terraform-aws-modules/vpc/aws"

  name                 = "my-vpc"
  cidr                 = "10.0.0.0/16"
  azs                  = ["eu-central-1a", "eu-central-1b", "eu-central-1c"]
  public_subnets       = ["10.0.1.0/24", "10.0.2.0/24", "10.0.3.0/24"]
  enable_dns_support   = true
  enable_dns_hostnames = true
}
Be aware that an EKS cluster needs at least two subnets in different availability zones. Enabling the DNS related flags is necessary to allow the worker nodes to find and register themselves at the API server.
Creating the EKS cluster
Similar to the VPC, I recommend you to use the aws-eks Terraform module if your EKS setup is not too far away from the ordinary. Below you can find an example Terraform code snippet that uses the previously discussed VPC.
1
2
3
4
5
6
7
8
9
10
11
12
13
14
15
module "cluster" {
  source          = "terraform-aws-modules/eks/aws"
  cluster_name    = "cluster"
  cluster_version = "1.18"
  vpc_id          = var.vpc_id
  subnets         = var.vpc_subnet_ids
  enable_irsa     = true

  worker_groups = [
    {
      instance_type = "t3.medium"
      asg_max_size  = 3
    }
  ]
}
The enable_irsa flag will lead to the OIDC (OpenID Connect) provider being created. Additionally we will define a Terraform output that contains its ARN (Amazon Resource Name) which will be used in the next step.
1
2
3
output "oidc_provider_arn" {
  value = module.cluster.oidc_provider_arn
}
And that’s all you need to continue with the next step.
Creating a service account associated with an IAM role
In this example we are going to create a service account that has full access to all of your S3 buckets. This can be easily changed by adjusting the policies that you attach to your IAM role.
To start with we need to define a few variables.
1
2
3
4
5
ROLE_NAME=s3-writer # the name of your IAM role
SERVICE_ACCOUNT_NAME=s3-writer # the name of your service account name
SERVICE_ACCOUNT_NAMESPACE=default # the namespace for your service account
PROVIDER_ARN=$(terraform output -json | jq -r .oidc_provider_arn.value) # the ARN of your OIDC provider
ISSUER_HOSTPATH=$(aws eks describe-cluster --name cluster --query cluster.identity.oidc.issuer --output text | cut -f 3- -d'/') # the host path of your OIDC issuer
The most important step is defining the correct assume policy for your IAM role.
1
2
3
4
5
6
7
8
9
10
11
12
13
14
15
16
17
18
19
$ cat > assume-policy.json << EOF
{
  "Version": "2012-10-17",
  "Statement": [
    {
      "Effect": "Allow",
      "Principal": {
        "Federated": "$PROVIDER_ARN"
      },
      "Action": "sts:AssumeRoleWithWebIdentity",
      "Condition": {
        "StringEquals": {
          "${ISSUER_HOSTPATH}:sub": "system:serviceaccount:${SERVICE_ACCOUNT_NAMESPACE}:${SERVICE_ACCOUNT_NAME}"
        }
      }
    }
  ]
}
EOF
This will allow the service account to switch to your role using the AssumeRoleWithWebIdentity command.
Afterwards you can create the new role using the above assume policy and attach your desired policies to it.
1
2
3
$ aws iam create-role --role-name $ROLE_NAME --assume-role-policy-document file://assume-policy.json
$ aws iam update-assume-role-policy --role-name $ROLE_NAME --policy-document file://assume-policy.json
$ aws iam attach-role-policy --role-name $ROLE_NAME --policy-arn arn:aws:iam::aws:policy/AmazonS3FullAccess
The last step is to create the Kubernetes Service Account and annotate it with the role ARN.
1
2
3
$ kubectl create sa $SERVICE_ACCOUNT_NAME
$ S3_ROLE_ARN=$(aws iam get-role --role-name $ROLE_NAME --query Role.Arn --output text)
$ kubectl annotate sa $SERVICE_ACCOUNT_NAME eks.amazonaws.com/role-arn=$S3_ROLE_ARN
Using the service account in your application
Assigning the newly created service account to your application only requires adding a single line to your Deployment or Job manifest.
1
2
3
4
5
6
7
8
9
10
11
12
apiVersion: apps/v1
kind: Deployment
spec:
  ...
  template:
    ...
    spec:
      serviceAccountName: s3-writer
      containers:
      - image: myapp:latest
        name: myapp
        ...
This will result in the EKS Pod Identity Webhook injecting some environment variables and a volume mount into each of your pods that contain the access credentials for your IAM role. If you use a recent version of the AWS SDK these will be picked up automatically when creating a new session and you are good to go.
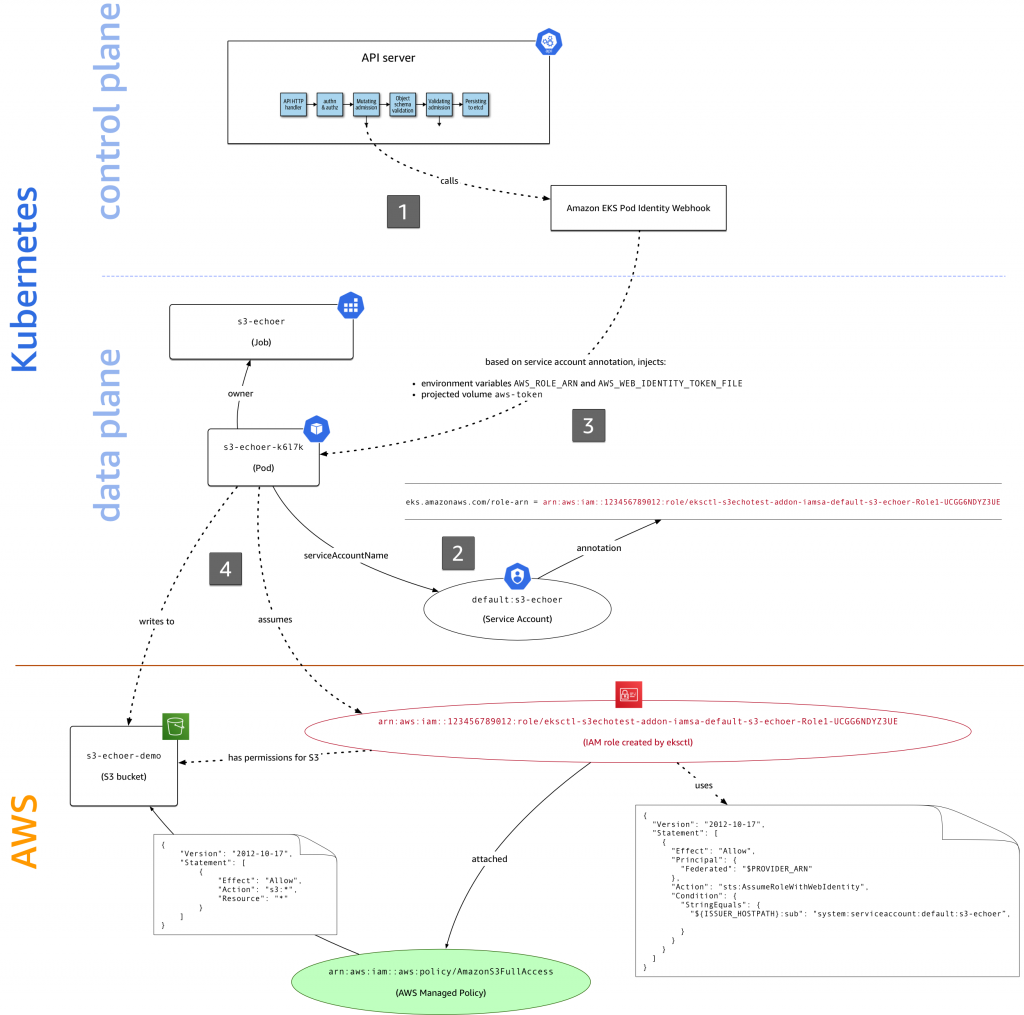
As a conclusion you can find an overview of all components and processes being part of the IRSA concept below.
For further details check out the official AWS blog post about IRSA.